“Offline First” with Service Worker (Building a PWA, Part 1)
Over the past 5 months, I have been doing Udacity’s Senior Web Developer Nanodegree. For my final Capstone project (I've graduated now! 💃🏿), I had to create my very own web application that would function just as a native mobile application would, using all I learned throughout the Nanodegree. So, I decided to create a “Progressive Web Application” for this blog.
Get the Application | View Source
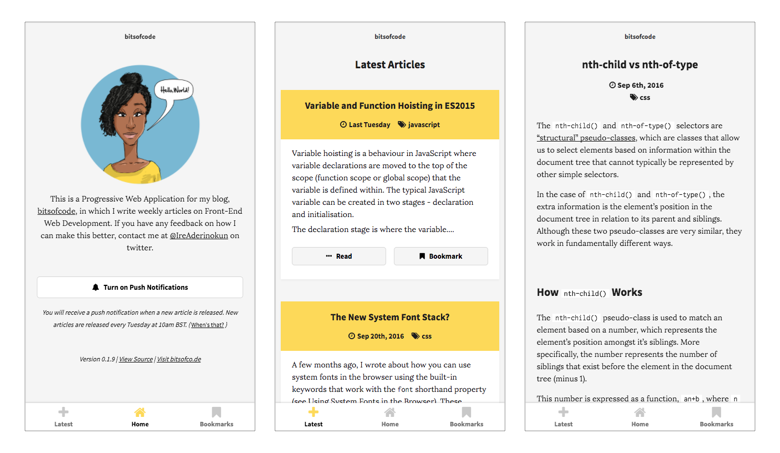
The Application #
The application I created allows users to read the latest articles from the blog (even when offline), bookmark interesting articles, and receive push notifications when a new article is released.
There are four pages available -
- The Homepage is just an introduction to the application. Here is also the setting to enable/disable push notifications when a new article is released.
- On Latest Articles page are the latest articles from the RSS feed. It displays excerpts from the latest 10-15 articles from the blog.
- The Bookmarks page is the list of bookmarked articles. It displays the excerpts of all bookmarked articles.
- Finally, the Single Article page displays the full article the user is reading.
The primary feature of the application is it's offline capabilities. There are two parts to creating an "offline-first" application -
- Cache the app shell so pages and assets are accessible offline
- Load locally-saved data first, then fetch updated data later if the network permits
In this article, I will go over how I achieve the first, using Service Worker. Next week, I will go over the second part. In the final part of this series, I will demonstrate how I implemented push notifications.
Libraries & Tools #
To make it as light as possible, I decided to build this application without the use of any front-end framework, just plain 'ol JavaScript. Here are some of the tools I used -
- Gulp.js for build process
- Handlebars.js for templating
- SASS for awesome CSS
- Babel for compiling ES2015
- Firebase for hosting & SSL
The App Shell Model #
The App Shell Model is a way of architecting a progressive web application. The app shell is the "minimal HTML, CSS and JavaScript powering a user interface" (Google Developers). It is all the parts of the page that are static and can be cached, so that it only needs to be loaded once.
For example on the Latest Articles page, this is the shell (left) and when the articles are fetched, they are injected into the main part of the page (right).
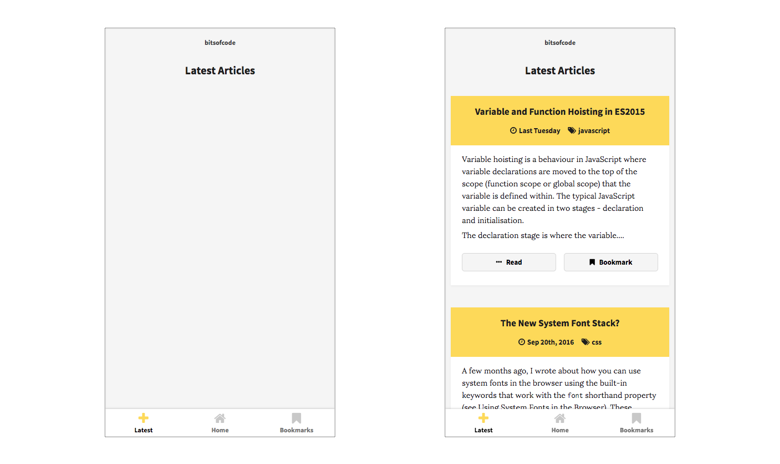
On first visit over a 3G connection, the page will load at a relatively normal pace. This is when the app shell is cached. On repeated visits, the page shell loads almost instantly because there is no need to fetch it from a remote source.
Precaching the App Shell #
The cornerstone of a Progressive Web Application is the Service Worker. The Service Worker allows us an unprecedented control over the network by allowing us to intercept any and all fetch requests from the main document. Combined with the Cache Storage API, we can use the Service Worker to quickly serve content, even while completely offline.
In my Setting up a Basic Service Worker video tutorial, I showed how to handle precaching the app shell completely manually. In that method, we had to handle adding files to a versioned cache as well as checking for files from previous cache versions and clearing them out, like so -
var cacheName = 'v1';
var cacheFiles = [
	'./',
	'./index.html',
	'./js/app.js',
	'./css/reset.css',
	'./css/style.css'
];

self.addEventListener('install', function(e) {
    e.waitUntil(
    	// Open the cache
	    caches.open(cacheName).then(function(cache) {

	    	// Add all the default files to the cache
			console.log('[ServiceWorker] Caching cacheFiles');
			return cache.addAll(cacheFiles);
	    })
	);
});

self.addEventListener('activate', function(e) {
    e.waitUntil(
    	// Get all the cache keys (cacheName)
		caches.keys().then(function(cacheNames) {
			return Promise.all(cacheNames.map(function(thisCacheName) {

				// If a cached item is saved under a previous cacheName
				if (thisCacheName !== cacheName) {

					// Delete that cached file
					console.log('[ServiceWorker] Removing Cached Files from Cache - ', thisCacheName);
					return caches.delete(thisCacheName);
				}
			}));
		})
	);
});
However, there is now a much easier way to handle precache assets, with Google’s Service Worker Toolbox library*. Now, to add assets for precache, all we have to do is pass the toolbox an array of the files, and everything else will be handled for us.
// Import the Service Worker Toolbox file
importScripts('js/lib/sw-toolbox/sw-toolbox.js');

const precacheFiles = [
	'./',
	'./index.html',
	'./js/app.js',
	'./css/reset.css',
	'./css/style.css'
];

// Precache the files
toolbox.precache(precacheFiles)
We can check that the files have been cached in our developer tools. In Chrome, we can find the Cache Storage under Developer Tools > Application > Cache Storage. There should be a new store titled something like $$$toolbox-cache$$$SITE_URL_HERE$$$. For example, the storage for the bitsofcode app is called $$$toolbox-cache$$$https://app.bitsofco.de/$$$. When we click on the cache store, we can see the list of files we have cached.
* Note - In a recent update, Google created a separate library, [Service Worker Preacache](https://github.com/GoogleChrome/sw-precache), which deals with precaching of assets alone. It works in a totally different way to the toolbox. It works with your build tool, e.g. Gulp, and generates the Service Worker file for you. Because of this major difference, I decided to stick with the toolbox as it is what I used when I did my Nanodegree. However, I might write about the new Precache library in a later article.
Serving the Precached Files #
Getting the files into the cache is only half the battle, we need to actually serve it to the user. In our Service Worker, we can listen for when there is a fetch request from the document using the fetch event listener.
self.addEventListener('fetch', (event) => {

  // Do stuff

});
Within this event, what we want to do it this -
- Check the cache if a file matching that request is available
- If it is, respond to the document with the file from the cache
- If it isn’t, fetch the file from the network and respond to the document with the fetched file
Here is how we can execute that -
self.addEventListener('fetch', (event) => {
    // Respond to the document with what is returned from

    event.respondWith(

		// 1. Check the cache if a file matching that request is available

		caches.match(event.request).then((response) => {

			// 2. If it is, respond to the document with the file from the cache
        	if ( response ) return response

			/ 3. If it isn’t, fetch the file from the network and respond to the document with the fetched file
			return  fetch(event.request)

		})

    );

});
And because we are writing ES2015, we can shorten this into one glorious line -
self.addEventListener('fetch', (event) => {

    event.respondWith( caches.match(event.request).then((response) => response || fetch(event.request)) );
});
Now, if we try to access any of the preached files while offline (or online), the page will load instantly with the cached files.
That's it! Next week I will go over the second part of the "Offline First" model, using IndexedDB to store the dynamic data (in this case the articles). You can try using the application yourself at app.bitsofco.de, or check out the source code on my GitHub repository.