Making a Polymer Element for CanIUse Embed
About a year ago, I made an embed for caniuse.com., which pulls up-to-date data from the site into an embeddable widget, like this -
You can read about how I built it in my article, Creating an Embed for CanIUse. Lately, I have been interested in Polymer and Custom Elements, so I decided to make a Polymer element version of the embed.
How it Works #
Before getting into how the Polymer element is used, we need to revisit how the embed itself works. The embed is an iframe that loads a particular document. This document is hosted at -
https://caniuse.bitsofco.de/embed/index.html
This url accepts 2 parameters -
feat- the ID of the feature on caniuseperiods- The browser versions to display, e.g.current,past_1,future_1etc.
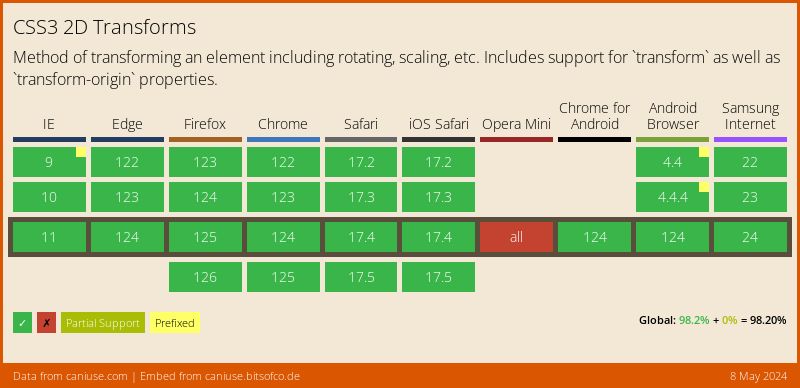
For example, for the "CSS 2D Transforms" feature, the embed is hosted at -
https://caniuse.bitsofco.de/embed/index.html?feat=transforms2d&periods=future_1,current,past_1,past_2
To use the plain JavaScript embed, you have to include a placeholder element in your document that contains three pieces of data -
- The feature slug
- The number of future browser versions to display
- The number of past browser version to display
For example, this is a placeholder for the "CSS 2D Transforms" feature -
<p class="ciu_embed" data-feature="transforms2d" data-periods="future_1,current,past_1,past_2">
  <!-- Placeholder/fallback content here -->
</p>
Finally, you have to include a script in your document that will load the actual iframe into the placeholder element.
<script src="//cdn.jsdelivr.net/caniuse-embed/1.0.1/caniuse-embed.min.js"></script>
How the Polymer Element Works #
The Polymer element replaces the plain script a user would typically include, that loads the iframe onto the page. Instead, to use the Polymer element, a user would import it onto their page and use it in the following way -
<caniuse-embed feature="transforms2d" future-versions="1" past-versions="2"></caniuse-embed>The Polymer element then loads the iframe the same way the plain script does.
Creating the Polymer Element #
The entirety of a custom Polymer element exists in a single HTML file, within a <dom-module> element. Inside this <dom-module>, we have the HTML template, styles, and scripts associated with the custom element.
The most basic version of the <caniuse-embed> element, which will just display "Hello, World", looks like this -
<!-- Import the Polymer library first -->
<link rel="import" href="path/to/polymer/polymer.html">

<dom-module id="caniuse-embed">
	<template>
		<style>/* Custom styles here*/</style>

		<!-- HTML Template -->
		Hello, world!
	</template>
	<script>
		// Initialise Polymer element
		Polymer({
    		is: 'caniuse-embed'
    	});
	</script>
</dom-module>
To use this element in a page, we just need to import it into the document, then use the element like any other HTML element.
<html>
<head>
	<link rel="import" href="path/to/caniuse-embed.html">
</head>
<body>
	<caniuse-embed></caniuse-embed>
</body>
</html>
This will display the template, defined in the caniuse-embed.html -
Hello, world!
Adding Properties #
Now that we have created the element, we can start adding properties to it. To add properties to an element, we add them to properties in the Polymer object, specifying any details for the property.
For the <caniuse-embed>, there are three properties - feature, futureVersions, and pastVersions.
Polymer({
	is: 'caniuse-embed',
	properties: {
      feature: String,
      futureVersions: String,
      pastVersions: String
    }
})
When using the property, users can add values to them by adding them as attributes to the element. Note that properties that are written in camelCase are converted to kebab-case when being used as properties.
<caniuse-embed feature="viewport-units" future-versions="1" past-versions="2"></caniuse-embed>We can access the values of properties in our template by wrapping it in [[ propertyName ]], which signifies data binding.
<template>
Feature: [[feature]]
Future Versions: [[futureVersions]]
Past Versions: [[pastVersions]]
</template>
We can also access the values of properties in the script, using this.propertyName -
<script>
console.log(this.feature)
console.log(this.futureVersions)
console.log(this.pastVersions)
</script>
Styling the Element #
We add styling to our custom element in the <style> block within the template. To style the actual element created, in this case <caniuse-embed>, we use the :host selector.
For the caniuse embed, I was just loading an iframe, so I didn't need to add much styling, besides setting the <caniuse-embed> to full-width.
<template>
	<style>
		:host {
			display: block;
			width: 100%;
		}
	</style>
</template>
Loading the Embed #
Finally, I need to actually load the iframe into the template with the appropriate url. There are two ways I could do this
- Have the iframe already in the template, and use data binding to add the properties to the particular parts of the url
- Create the iframe using javascript and insert it into the template
For this embed, I chose to use the latter method. This is because, the way in which the properties are used to build the url, is not the same way in which they are passed to the template. This means that, for the pastVersions and futureVersions properties in particular, I needed to convert that information into the way in which the embed expects in the url.
To do this, I used the ready() method, which executes a function when the element is ready.
Polymer({
    is: 'caniuse-embed',
    properties: { ... },
    ready: function() {

      // Custom function to convert the two properties into the url-ready string
      const periods = calculatePeriods(this.futureVersions, this.pastVersions);

      this.innerHTML = `
      <iframe src="//caniuse.bitsofco.de/embed/index.html?feat=${this.feature}&periods=${periods}"
              frameborder="0"
              width="100%"
              height="400px"></iframe>
      `;

    }
})
Putting it all Together #
As I mentioned, the entirety of the custom element is defined in one HTML file, caniuse-embed.html. This is what that file looks like -
<link rel="import" href="../polymer/polymer.html">

<dom-module id="caniuse-embed">

  <template>
    <style>
      :host {
        display: block;
        width: 100%;
      }
    </style>

    <!-- HTML added in ready() -->

  </template>

  <script>
  Polymer({
    is: 'caniuse-embed',
    properties: {
      feature: String,
      futureVersions: String,
      pastVersions: String
    },
    ready: function() {

      if ( !this.feature ) this.textContent = `A feature was not included. Go to <a href='https://caniuse.bitsofco.de/#polymer'>https://caniuse.bitsofco.de/#polymer</a> to get help.`;

      const periods = calculatePeriods(this.futureVersions, this.pastVersions);

      this.innerHTML = `
      <iframe src="//caniuse.bitsofco.de/embed/index.html?feat=${this.feature}&periods=${periods}"
              frameborder="0"
              width="100%"
              height="400px"></iframe>
      `;

    }
  });


  function calculatePeriods(futureVersions, pastVersions) { ... }

  // Logic to handle re-sizing of iFrame here

  </script>

</dom-module>
If you would like to see the full source for the element, you can see it on my GitHub repository, ireade/caniuse-embed-polymer. There, you can also find details on how to use it in your website or application.