Making botsofcode - An Introduction to Twitter Bots
Another addition to my bot army! This time, I made a very simple twitter bot for this blog, @botsofcode (Source Code).
The Setup #
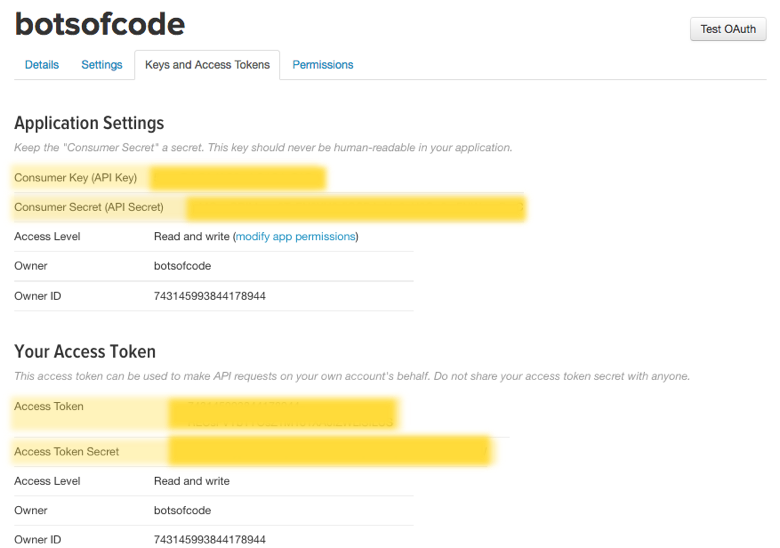
I created @botsofcode using Twit, a simple Twitter API Client for Node.js. To setup Twit, we need to first create a Twitter Application and get four private keys.
- Consumer Key (API Key)
- Consumer Secret (API Secret)
- Access Token
- Access Token Secret
Once the application is created, these keys can be found under the ‘Keys and Access Tokens’ section.
Once we have these keys, we can create a new Node.js project and initialise Twit.
const Twit = require('twit');
const T = new Twit({
	consumer_key: APPLICATION_CONSUMER_KEY_HERE,
	consumer_secret: APPLICATION_CONSUMER_SECRET_HERE,
	access_token: ACCESS_TOKEN_HERE,
	access_token_secret: ACCESS_TOKEN_SECRET_HERE
});
Listening for Events and Keywords #
Twitter's Streaming APIs gives us access to the global stream of tweets. There are two streams we can currently follow -
- The Public Stream, which is the stream of all public tweets
- The User Stream, which is a stream of tweets corresponding to a single user's view
@botsofcode uses the public stream, because it listens for tweets from any user that mention this blog.
We can create a stream of tweets based on a filter using the statuses/filter endpoint and passing an object with the filter parameters. We can pass parameters like language or location, but to filter by keyword, we use the track parameter. This accepts a string or array of keywords to watch for.
const stream = T.stream('statuses/filter', { track: ['bitsofco.de', 'bitsofcode'] });Once the stream is created, we can listen for any tweets that fall within the stream.
stream.on('tweet', (tweet) => {
	// Do something with the tweet
});
Responding to Events #
Twitter's REST API allows us to take pretty much any action you could if you were using twitter directly. We can post tweets, retweet, reply to tweets, follow users, favourite/like, etc.
I built @botsofcode to be able to take four actions - retweet, like, reply, and add to a list.
Retweet #
If the tweet found from the stream was from myself (@ireaderinokun), @botsofcode should just retweet it. We can retweet by posting to the /statuses/retweet/:id endpoint.
const me = {
	id: 2714960622,
	screen_name: 'ireaderinokun'
};

const stream = T.stream('statuses/filter', { track: ['bitsofco.de', 'bitsofcode'] });
stream.on('tweet', (tweet) => {
	if ( tweet.user.id === me.id ) {
		T.post('statuses/retweet/:id', { id: tweet.id_str });
		return;
	}
});
Like #
If the tweet was from any other account, like it. We can like a tweet by posting to the /favorites/create endpoint, passing the id of the tweet we want to like.
stream.on('tweet', (tweet) => {

	if ( tweet.user.id === me.id ) { ... }

	T.post('favorites/create', { id: tweet.id_str });
});
Reply #
If the tweet was by any other user, send them a reply. We can reply to a tweet by posting to the /statuses/update endpoint and passing the id of the tweet we are replying to.
stream.on('tweet', (tweet) => {

	if ( tweet.user.id === me.id ) { ... }

	T.post('favorites/create', { id: tweet.id_str });

	T.post('statuses/update', {
		status: `@${tweet.user.screen_name} Thanks for sharing! ${emojis[Math.floor(Math.random() * emojis.length)]`,
		in_reply_to_status_id: tweet.id_str
	});

});
Add to List #
Finally, add the user to a twitter list. We can do this by posting to the lists/members/create endpoint and passing the list parameters.
stream.on('tweet', (tweet) => {

	if ( tweet.user.id === me.id ) { ... }

	T.post('favorites/create', { id: tweet.id_str });

	T.post('statuses/update', {
		status: `@${tweet.user.screen_name} Thanks for sharing! ${emojis[Math.floor(Math.random() * emojis.length)]`,
		in_reply_to_status_id: tweet.id_str
	});

    T.post('lists/members/create', {
		slug: 'bitsofcoders',
		owner_screen_name: botsofcode.screen_name,
		screen_name: tweet.user.screen_name
	});

});
Deployment #
I used Heroku to host @botsofcode. Deploying a Node.js app to Heroku is simple, we just need to make sure that the following information is specified in our package.json file -
- The main script
- The start script
- Any dependencies
- The version of Node.js
This is my package.json file for the bot -
{
  "name": "botsofcode",
  "version": "1.0.0",
  "description": "A bot for bitsofco.de",
  "main": "index.js",
  "scripts": {
    "start": "node index.js"
  },
  "author": "ire-aderinokun",
  "dependencies": {
    "twit": "^2.2.4"
  },
  "engines": {
    "node": "4.1.1"
  }
}
Optional - Setting up Config Variables #
To keep the Twitter Application keys out of the app files, I used Heroku's config variables. These can be defined under the application settings.
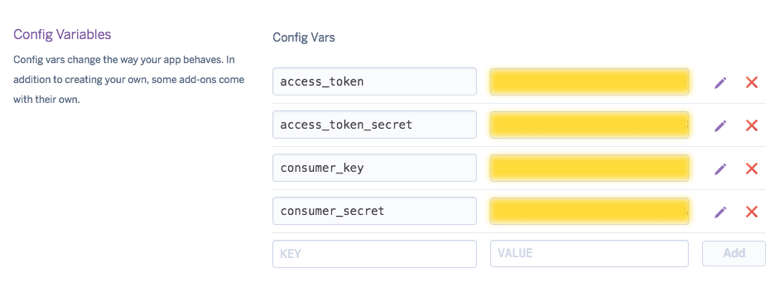
In the actual application script, we can then reference them as environment variables -
const T = new Twit({
	consumer_key: process.env.consumer_key,
	consumer_secret: process.env.consumer_secret,
	access_token: process.env.access_token,
	access_token_secret: process.env.access_token_secret
});
That's it! You can follow @botsofcode, view it's source, or click the tweet button below to see it in action.