Understanding the Critical Rendering Path
When a browser receives the HTML response for a page from the server, there are a lot of steps to be taken before pixels are drawn on the screen. This sequence the browsers needs to run through for the initial paint of the page is called the "Critical Rendering Path".
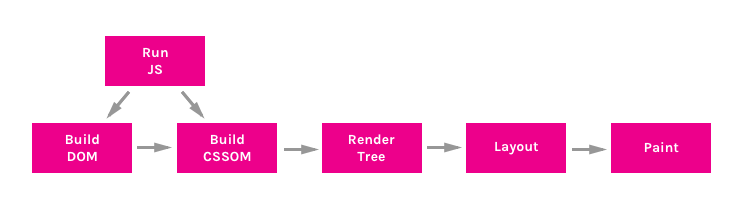
Knowledge of the CRP is incredibly useful for understanding how a site's performance can be improved. There are 6 stages to the CRP -
- Constructing the DOM Tree
- Constructing the CSSOM Tree
- Running JavaScript
- Creating the Render Tree
- Generating the Layout
- Painting
1. Constructing the DOM Tree #
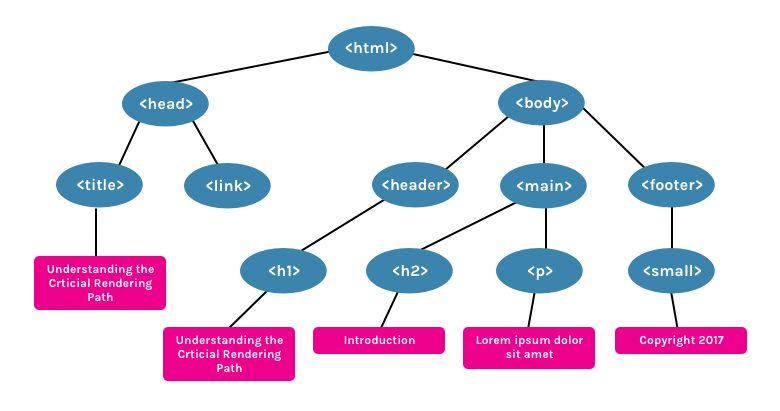
The DOM (Document Object Model) Tree is an Object representation of the fully parsed HTML page. Starting with the root element, <html>, nodes are created for each element/text on the page. Elements nested within other elements are represented as child nodes and each node contains the full attributes for that element. For example, an <a> element will have the href attribute associated with it’s node.
Take, for example, this sample document -
<html>
<head>
  <title>Understanding the Critical Rendering Path</title>
  <link rel="stylesheet" href="style.css">
</head>
<body>
  <header>
      <h1>Understanding the Critical Rendering Path</h1>
  </header>
  <main>
      <h2>Introduction</h2>
      <p>Lorem ipsum dolor sit amet</p>
  </main>
  <footer>
      <small>Copyright 2017</small>
  </footer>
</body>
</html>
This will create the following DOM Tree -
A good thing about HTML is that it can be executed in parts. The full document doesn't have to be loaded for content to start appearing on the page. However, other resources, CSS and JavaScript, can block the render of the page.
2. Constructing the CSSOM Tree #
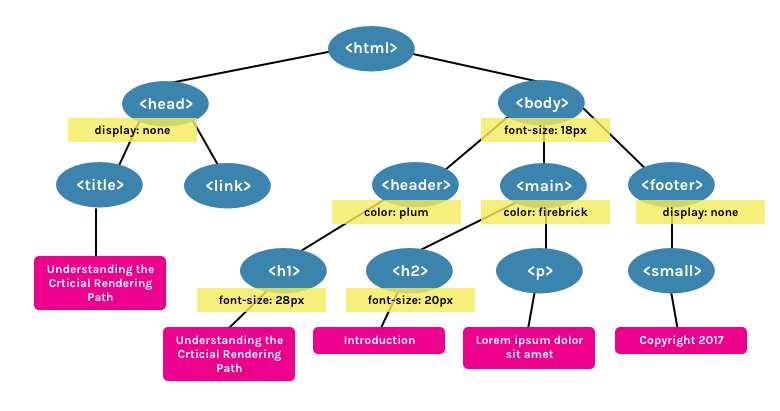
The CSSOM (CSS Object Model) is an Object representation of the styles associated with the DOM. It is represented in a similar way to the DOM, but with the associated styles for each node, whether they explicitly declared or implicitly inherited, included.
In the style.css file from the document mentioned above, we have the folowing styles -
body { font-size: 18px; }

header { color: plum; }
h1 { font-size: 28px; }

main { color: firebrick; }
h2 { font-size: 20px; }

footer { display: none; }
This will create the following CSSOM Tree -
CSS is considered a "render blocking resource". This means that the Render Tree (see below) cannot be constructed without first fully parsing the resource. Unlike HTML, CSS cannot be used in parts because of its inherit cascading nature. Styles defined later in the document can override and change styles that were previously defined. So, if we start using CSS styles defined earlier in the stylesheet before the entirety of the stylesheet has been parsed, we may get a situation where the wrong CSS is being applied. This means that CSS must be fully parsed before we can move on to the next stage.
CSS files are only considered render blocking if they apply to the current device. The <link rel="stylesheet"> tag can accept a media attribute, in which we can specify any media query which the styles within apply to. If, for example, we have a stylesheet with a media attribute of orientation:landscape, and we are viewing the page in portrait mode, that resource will not be considered render blocking.
CSS can also be "script blocking". This is because JavaScript files must wait until the CSSOM has been constructed before it can run.
3. Running JavaScript #
JavaScript is considered a "parser blocking resource". This means that the parsing of the HTML document itself is blocked by JavaScript.
When the parser reaches a <script> tag, whether that be internal or external, it stops to fetch (if it is external) and run it. This why, if we have a JavaScript file that references elements within the document, it must be placed after the appearance of that document.
To avoid JavaScript being parser blocking, it can be loaded asynchronously be applying the async attribute.
<script async src="script.js">4. Creating the Render Tree #
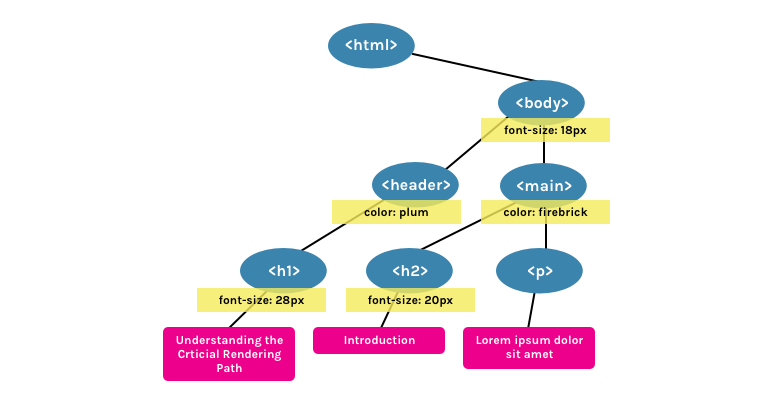
The Render Tree is a combination of both the DOM and CSSOM. It is a Tree that represents what will be eventually rendered on the page. This means that it only captures the visible content and will not include, for example, elements that have been hidden with CSS using display: none.
Using the example DOM and CSSOM above, the following Render Tree will be created -
5. Generating the Layout #
The Layout is what determines what the size of the viewport is, which provides context for CSS styles that are dependent on it, e.g. percentage or viewport units. The viewport size is determined by the meta viewport tag provided in the document head or, if no tag is provided, the default viewport width of 980px is used.
For example, the most common meta viewport value is to set the viewport size to correspond to the device width -
<meta name="viewport" content="width=device-width,initial-scale=1">If the user visits the webpage on a device with a width of, for example, 1000px, then sizes will be based on that unit. Half the viewport will be 500px, 10vw will be 100px, and so on.
6. Painting #
Finally, in the Painting step, the visible content of the page can be converted to pixels to be displayed on the screen.
How much time the paint step takes depends on the size of the DOM, as well as what styles are applied. Some styles require more work to execute than others. For example, a complicated gradient background-image will require more time than a simple solid background colour.
Putting it All Together #
To see the Critical Rendering Path in process, we can inspect it in DevTools. In Chrome, it is under the Timeline tab (in Canary, and soon to be Chrome stable, it's renamed Performance).
Take for example, our sample HTML from above (with an added <script> tag) -
<html>
<head>
  <title>Understanding the Critical Rendering Path</title>
  <link rel="stylesheet" href="style.css">
</head>
<body>
  <header>
      <h1>Understanding the Critical Rendering Path</h1>
  </header>
  <main>
      <h2>Introduction</h2>
      <p>Lorem ipsum dolor sit amet</p>
  </main>
  <footer>
      <small>Copyright 2017</small>
  </footer>
  <script src="main.js"></script>
</body>
</html>
If we look at the Event Log for the page load, this is what we get -
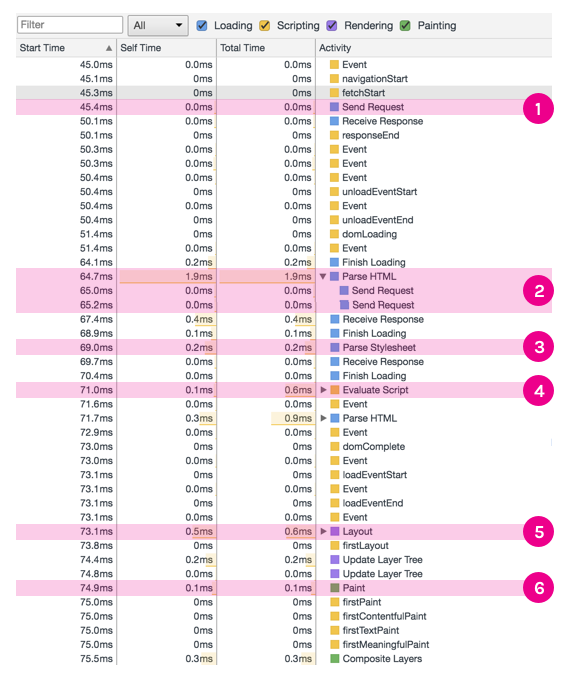
- Send Request - GET request sent for index.html
- Parse HTML and Send Request - Begin parsing of HTML and DOM construction. Send GET request for style.css and main.js
- Parse Stylesheet - CSSOM created for style.css
- Evaluate Script - Evaluate main.js
- Layout - Generate Layout based on meta viewport tag in HTML
- Paint - Paint pixels on document
Based on this information, we can make decisions on how to optimize the Critical Rendering Path. I will go into some of these techniques in later articles.